Hello everyone - My name is Scott. I am a PhD Candidate in Neuroscience. My GSoC project is focused on building tools for reading, analyzing, and visualizing eye-tracking data in Python.
Eye-trackers, as you may have guessed, allow us to measure where a person is looking, and are used to study a variety of things, such as visual attention, cognitive load, and emotion.
For this project I am working with MNE-Python, the de facto package for analyzing (neuro)-physiological data in Python. I've been using MNE for a couple of years now, and have contributed to a few minor PR's, so I am happy to be able to get more involved via this project.
MNE is a perfect home for this work, because not only is it a mature and well maintained package, but it already contains a number of functions that can be directly applied to eye-tracking data. Further, many researchers are collecting M/EEG, fNIRS data simultaneously with eye-tracking data, and being able to process/analyze these data in a single ecosystem will be a big benefit.
What did I do this week?
Fortunately, prior to starting my GSoC project, I had already completed an initial PR for reading eye-tracking data from a widely used system, SR Research Eyelink, so I already had some ground work to build off of.
This week, I focused on extending this reader to extract some important meta-information from eye-tracking data that will be needed for functions to be developed later in this project.
Namely, I wanted to extract and neatly store information about the eye-tracking calibration. Basically, a calibration is a common routine done at the start of an eye-tracking recording, where the participant is asked to look at points at different locations on the screen, so that the eye-tracker can calibrate itself to that specific participant, leading to more accurate data collection. Reviewing the quality of a calibration is a common and important first step in almost any eye-tracking processing pipeline.
Without going into the nitty gritty details, the code we developed will extract the information on any calibrations recorded in the data-file, and store it in a new, `Calibrations` class. For example, Information on the estimated error in the calibration, the eye that was used for the calibration, etc, are all stored in this `dict`-like class. We also developed a `plot` method for the calibration class, so the user can view the participants gaze to each calibration point.
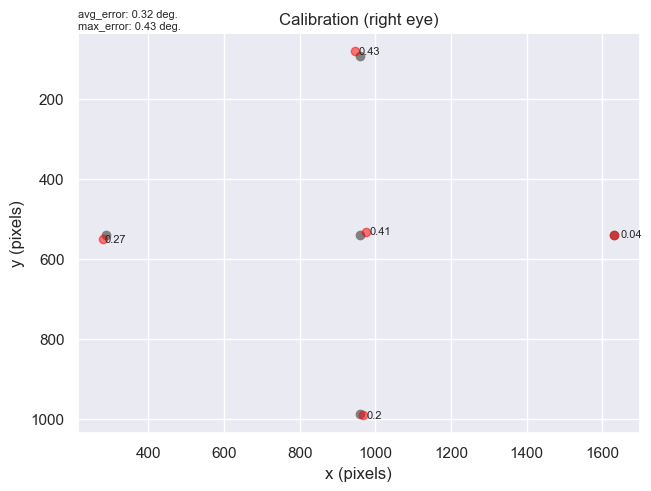
Here's a quick preview. Imagine the plot below is the screen that is used for eye-tracking. At the start of the session, the participant is presented with five points on the screen, one at a time, and is asked to look at them. The grey dots on the plot below are the coordinates of the points that the eye-tracker displayed to the participant. The red dots are the actual gaze positions when the participant looked at the calibration points. The number next to each red dot represents the offset (in visual degrees) between the grey dot (calibration point) and the red dot (actual gaze position). This information gives you a rough idea of the quality of the eye-tracking calibration for the participant. In short, the higher the offset, the worse the calibration. Finally, the text in the top left corner displays the average offset across all the calibration points, and the highest offset out of all the calibration points (in this case it's 0.43, which is the offset for the top calibration point).
What is coming up next?
Next week I will shift gears a bit, and turn towards developing a pre-processing function that is pretty fundamental to eye-tracking research: interpolating blinks. Basically, you can think of this process as removing blink artifact. More on that, next week!
Did I get stuck anywhere?
Not necessarily on anything specific, but my first week was a good reminder that when programming, there are always hiccups that appear in what you would otherwise think should be a simple and quick task : )
But here's something new I learned in Python this week...
This week I ran into the concept of structured arrays in NumPy. Structured arrays are essentially regular NumPy arrays, but were designed to mimic ‘structs’ in the C language, in that they allow you to store data of different types in the same array, each with a "field" name. This "field" name is the part I found interesting, because it allows you to (somewhat) use name indexing with numpy arrays, similar to the way you would with Pandas or Xarray. Take the following code as an example:
# Make a toy numpy array and some field names.
calibration_labels = ['point_x', 'point_y', 'offset', 'diff_x', 'diff_y']
calibration_vals = np.array([960., 92., 0.5, 23.7, 1.3])
dtype = [(field, 'f8') for field in calibration_labels]
this_calibration = np.empty(1, dtype=dtype)
# Assign a field name for each calibration value
for field, val in zip(calibration_labels, calibration_vals):
this_calibration[0][field] = val
print(this_calibration)
array([(960., 92., 0.5, 23.7, 1.3)], dtype=[('point_x', '<f8'),>
print(this_calibration["point_x"])
# [960.]
</f8'),>
Neat!

